Automatically Import People to Your Flows
Groove can automatically add new contacts and leads to your Flows based on criteria you choose.
Important details
- By default, Groove scans your Salesforce org for new leads or contacts every 3 hours and triggers an auto-import if matches are found.
- You must be an owner or editor of a Flow to manage Auto Import Settings. Some orgs only allow Clari Admins to configure Auto Import.
This article has two sections:
- How To Auto Import for a Specific Flow: This section covers the steps reps, managers, and admins can take to auto-import people to Flows.
- Real-Time Auto Import with Salesforce Flows: This section shows Salesforce Admin how to set up real time imports.
1. Navigate to a Flow that you have edit rights to.
2. Click on “Settings Tab” at the top of the Flow and scroll down to the “Auto Import People” section, or click on “Auto import people” option in the side navigation.
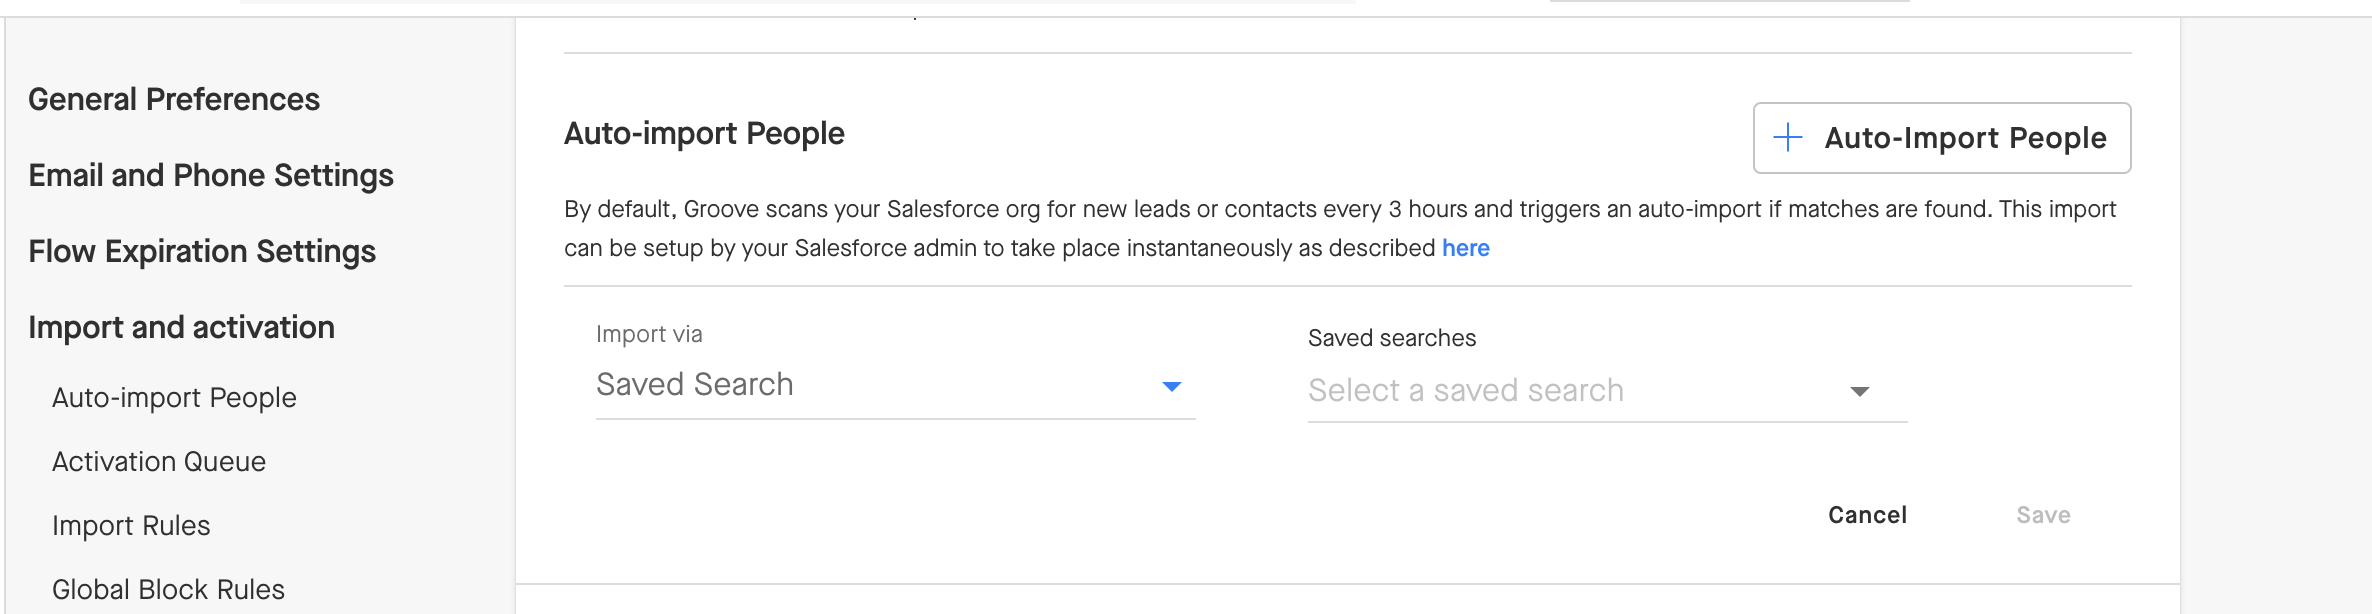
3. Click the “Auto Import People” for the configuration settings. Then, in the "Import via" dropdown, choose if you want to import via Saved Search or Salesforce Report. We'll cover these two options below before moving to the next step.
Saved Search Auto-Import
Groove will automatically import the people who meet the Saved Search criteria to your Flow. 3 hours later (or instantaneously if you have Real-Time Auto Import set up), Groove will automatically import any new people who meet the Saved Search criteria. If you don't have any Saved Searches to import from, check out this article to set up a Saved Search from the People Page.
Salesforce Auto-Import
With this option, you create a report in Salesforce that includes your desired filters to find the people you'd like to import to your Flow. In the Import via dropdown, choose Salesforce Report. Then on the right side, select the folder and file you want Groove to import from (see below).
4. Click "Save."
Let's cover some additional import options.
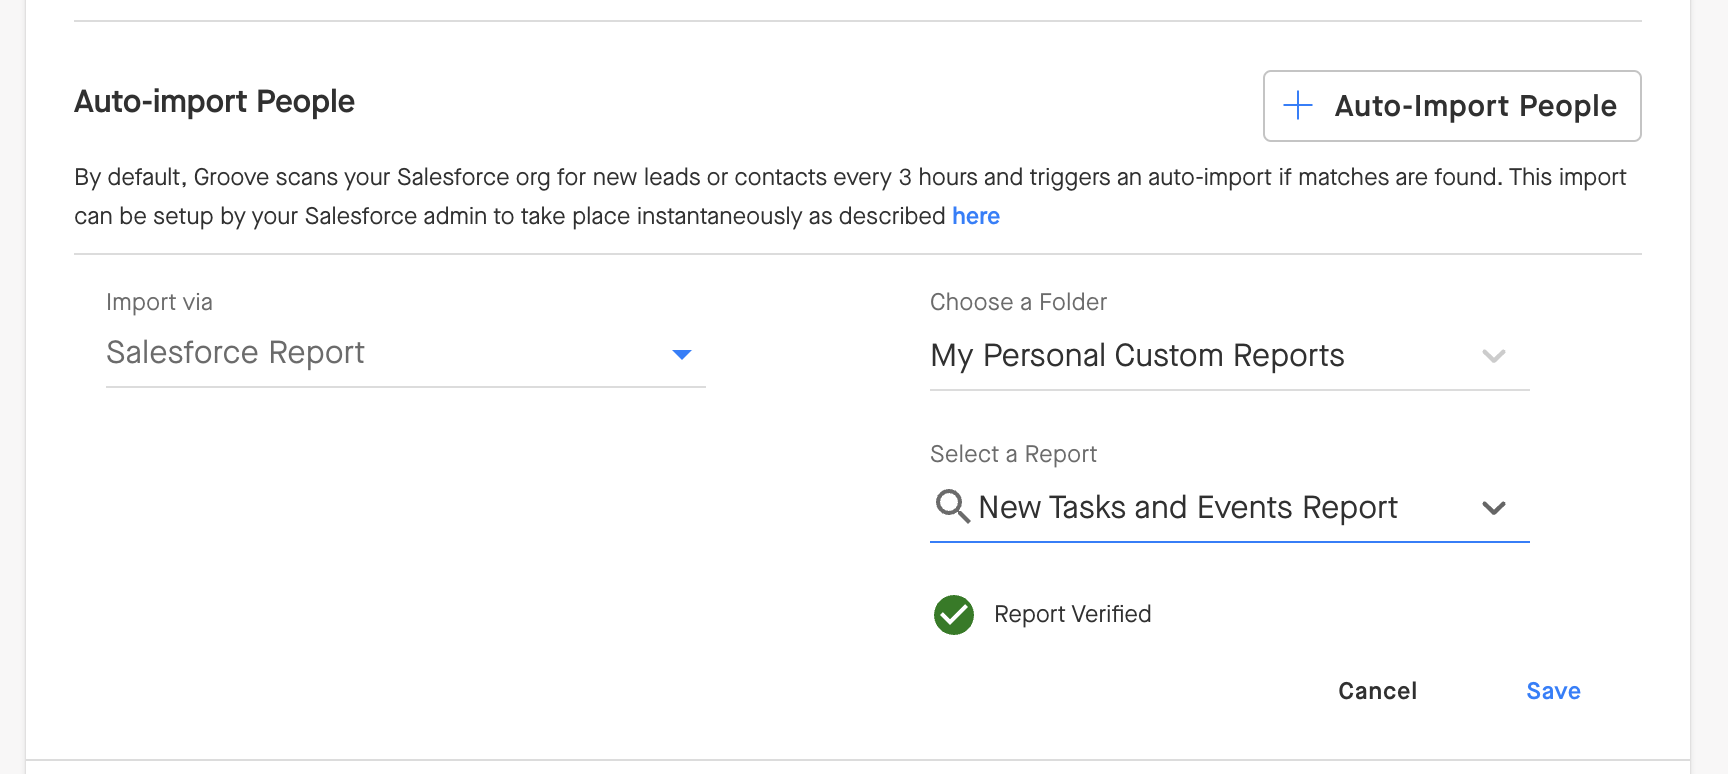
Restrict Imports
If you want to restrict users from manually importing people into the Flow, check the box in the setting above the Auto-import People section:
Auto-Assign Owner for Master Flows
If you're importing to a Master Flow, you'll have the options below which assigns the imported people to corresponding users. When you're importing from a Salesforce report, you have the option of assigning imported people by Salesforce Fields:

This section is for Salesforce Admin.
By default, Groove scans your Salesforce instance for new leads or contacts every 3 hours and triggers an auto-import if matches are found. However, your Salesforce Admin can configure Groove to auto-import leads in real-time via the “Salesforce Flow”.
The “Salesforce Flow” triggers Groove to run an import in all auto-import enabled flows. This means as soon as a lead or contact in Salesforce matches your auto-import criteria, it will be added to the Flow(s) instantly. It is critical to ensure that the contact/lead records are present in the reports/saved searches powering these imports. In order to set up the “Salesforce Flow,” follow the directions below.
Important details
- To use this feature you must have managed Package version 9.136 or higher is required to use Salesforce Flows for real-time auto import.
- Salesforce deprecated Workflow Rules and Process Builder in favor of Salesforce Flows. Learn more here.
Real-Time Auto Import with Salesforce Flows For Newly Created Leads or Contacts
Note: Workflow Rules must be disabled before enabling the automation Flows.
- Follow the steps from the Auto Import section above to set up an auto import rule to your Flow
- In Salesforce click Setup > Platform Tools > Process Automation > Flows
- For auto-import of contacts find the Salesforce Flow named Notify Groove on Contact Created Flow. For leads find Notify Groove on Lead Created Flow.
- Click the appropriate Salesforce Flow
- Once inside the Salesforce Flow, click Activate
Notice that these build in Salesforce Flow will trigger a potential auto-import each time a new contact or lead is created. The configuration above does not apply to existing leads or contacts. In case the lead/contact record does not match any of your auto-import criteria upon creation but it is later updated to meet the auto-import criteria, the lead/contact will still be auto imported — but up to 3 hours after it was updated.
Real-Time Auto Import with Salesforce Flows For Existing Leads or Contacts
To use Real-Time Auto Import for existing leads or contacts, you need a very similar “Salesforce Flow” to the one above. The Salesforce Flow triggers Groove to run an import in all auto-import enabled Flows. It's critical to ensure that the contact/lead records are present in the reports/saved searches powering these imports. To set up the Salesforce Flow, follow the directions below.
- Follow the steps in the Auto Import section above to set up an auto import rule to your Flow
- In Salesforce click Setup > Platform Tools > Process Automation > Flows
- Click into the Salesforce Flow called 'Notify Groove on Contact Created Flow' (or 'Notify Groove on Lead Created Flow' for leads)
- Click Save As
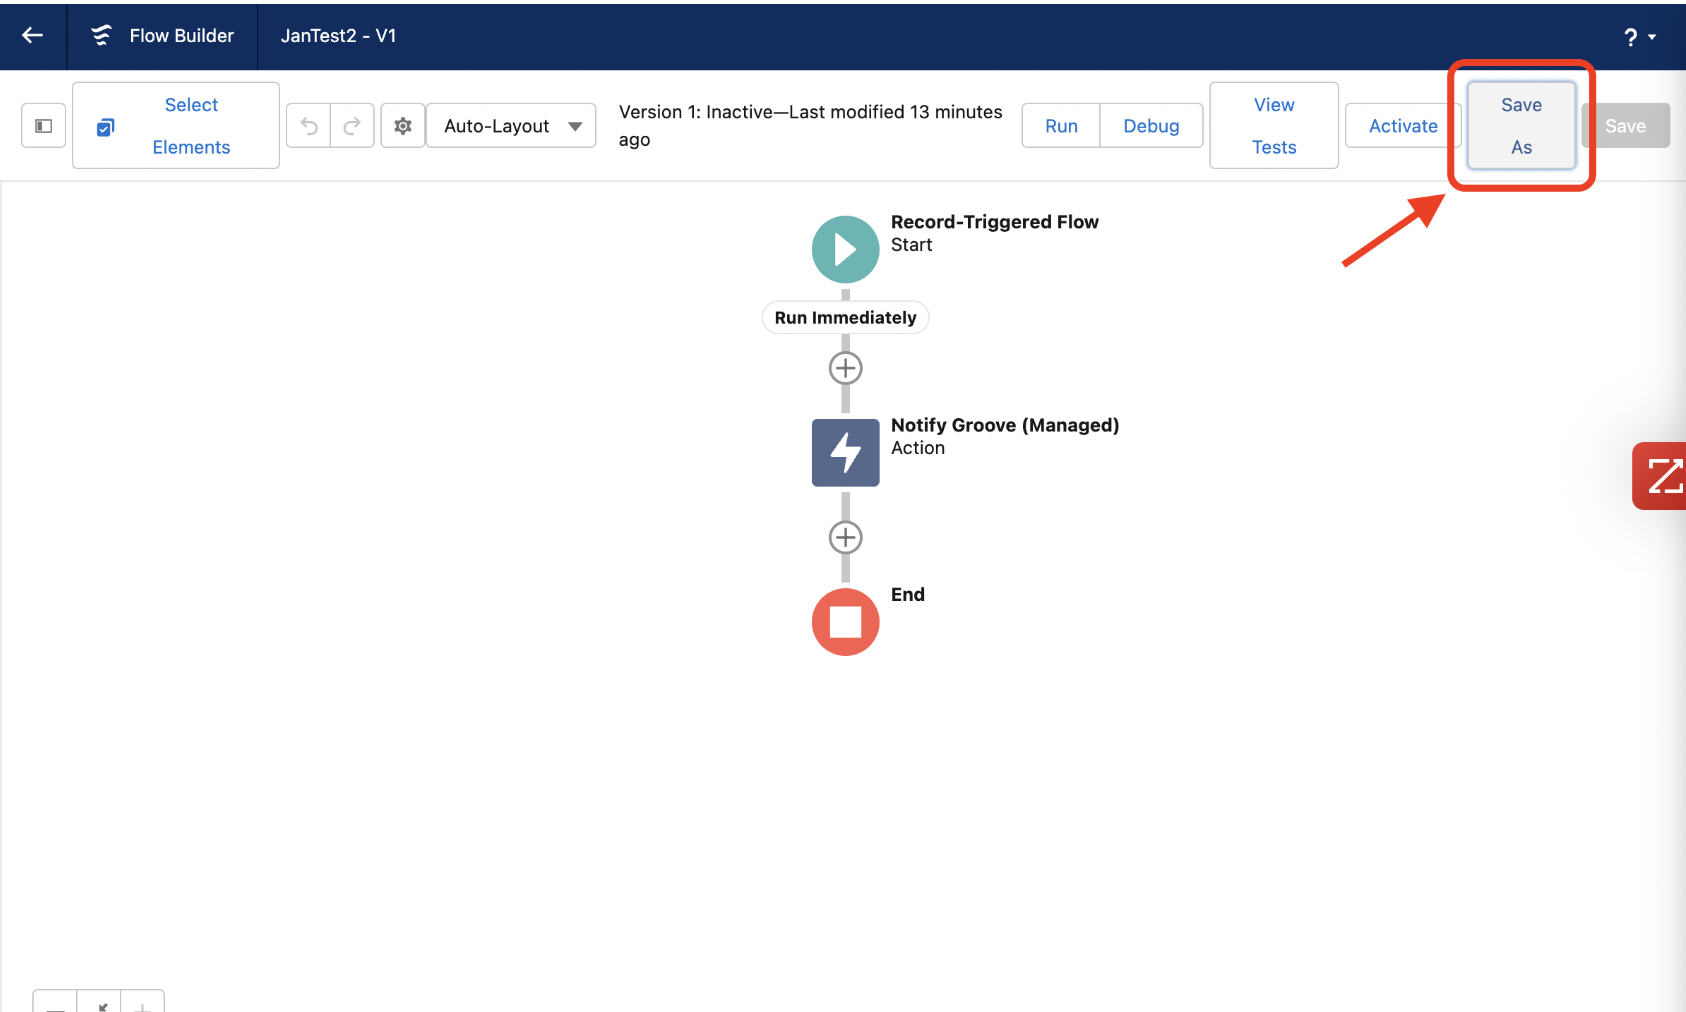
5. Provide the Flow Label and Flow API Name
6. Click Save
7. Click on Start to expand it
8. Click Edit
Formula: Set to criteria that would add the Contact/Lead to Grove Flows
The example below will trigger the Salesforce Rule when a Salutation changes to 'Mr.'
You can set the Conditional Requirements to trigger for different fields that your team finds relevant.
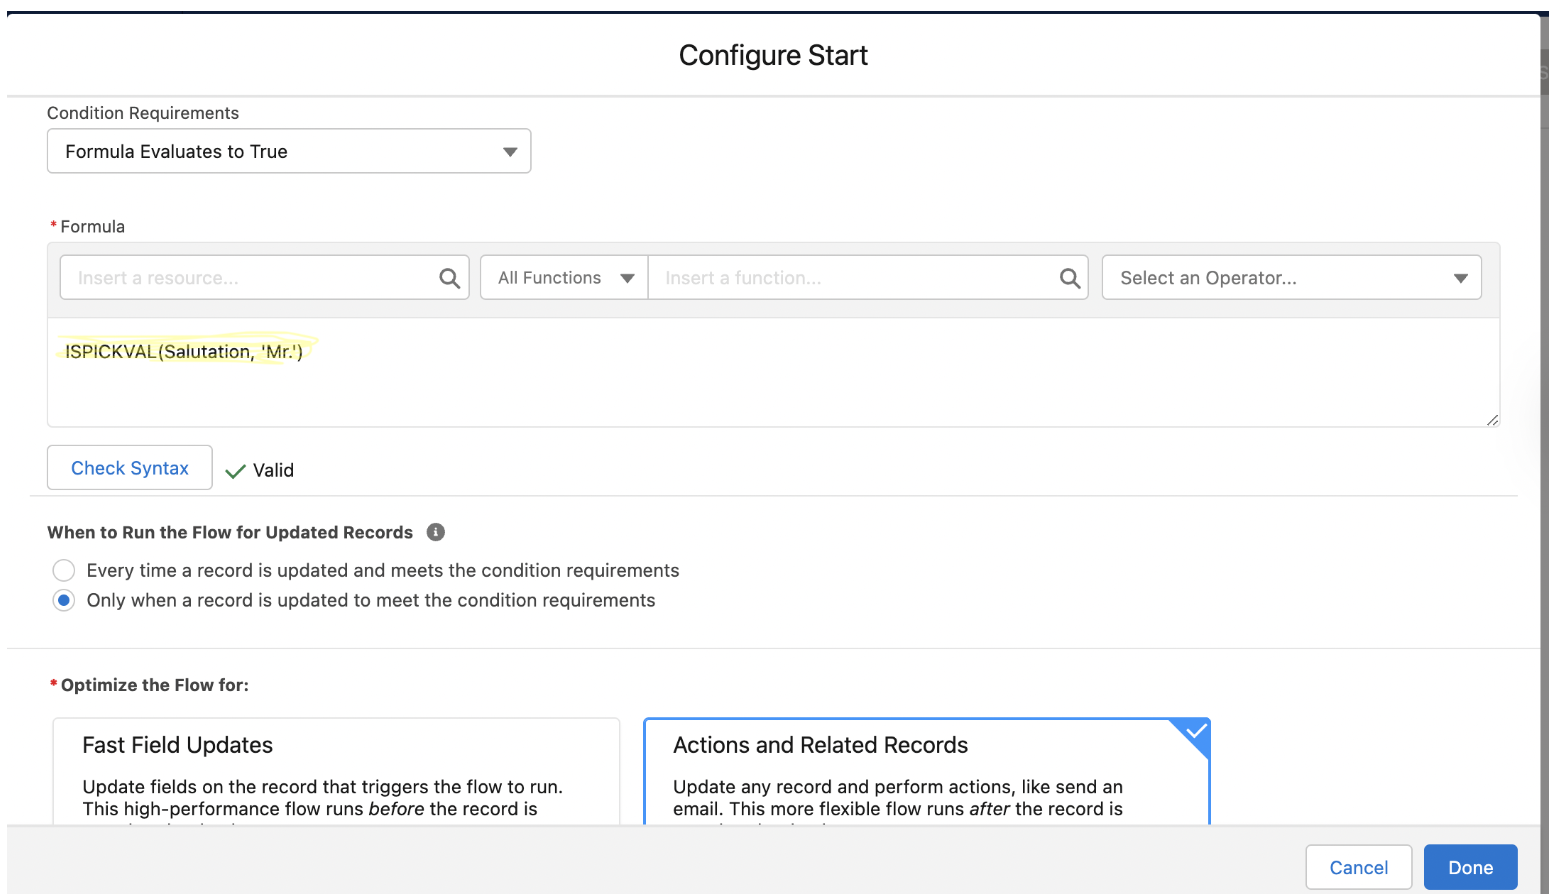
9. Click Check Syntax to make sure that the formula is written correctly
11. Click on Activate button
Deactivating Workflow Rules
To avoid unexpected importing behavior when switching over to use Salesforce Flows, the corresponding Workflow Rules must be deactivated before activating the Salesforce Flows.
To Deactivate:
-
In Salesforce click Setup | Process Automation | Workflow Rules
-
Find the Workflow Rule(s) that need to be deactivated
-
If you want to activate the Salesforce Flow for auto-importing contacts, the Workflow Rule that needs to be deactivated is Notify Groove on Contact Created (Managed)
-
If you want to activate the Salesforce Flow for auto-importing leads, the Workflow Rule that needs to be deactivated is Notify Groove on Lead Created (Managed)
-
Click on Deactivate for the selected Workflow Rule
Real-Time Auto Import using Legacy Workflow Rules For Newly Created Leads/Contacts
Note: Salesforce deprecated Workflow Rules and Process Builder in favor of Salesforce Flows.
Learn more here.
To set up the Workflow Rule with Legacy Rules, follow these steps:
-
-
In Salesforce click Setup > Workflow & Approval > Workflow Rules
-
For an auto-import of contacts find the workflow rule named "Notify Groove on Contact Created (Managed)." For leads find "Notify Groove on Lead Created (Managed)."
-
Click Activate and then Notify Groove (Managed)
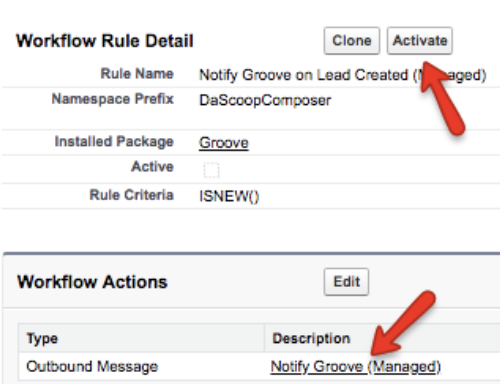
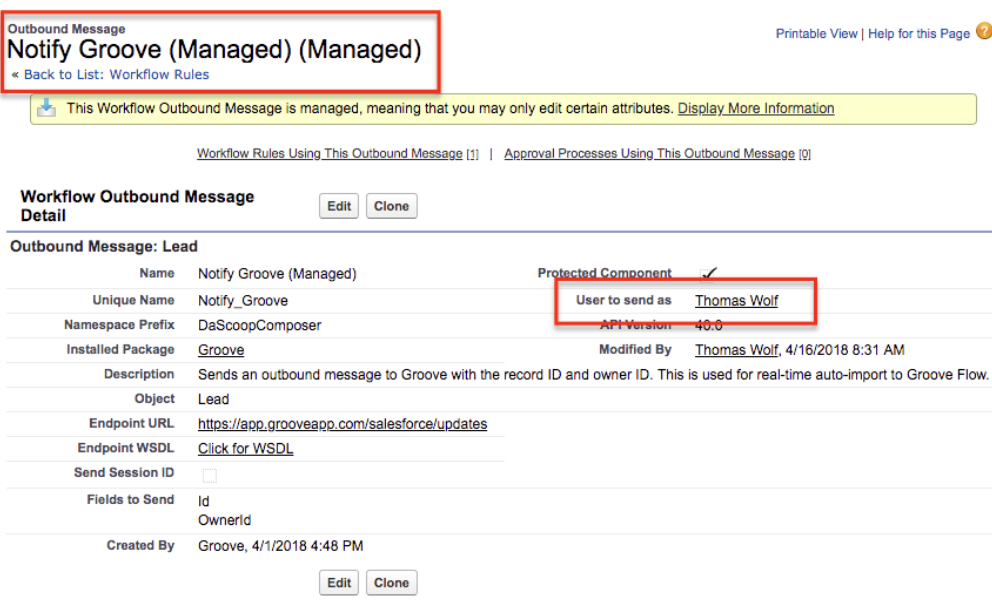
5. In the details view of the outbound message click Edit
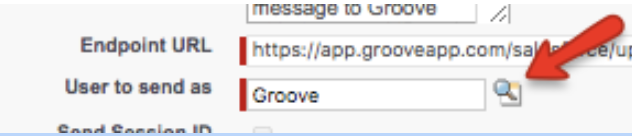
6. Note: The user lookup field "User to send as" will probably contain the pseudo user "Groove." Find a real user—ideally a user that will never be disabled and click Save.
Notice that these rules trigger a potential auto-import each time a new contact or lead is created. The configuration above does not apply to existing leads or contacts. In case the lead/contact record is does not match any of your auto-import criteria upon creation but it is later updated to meet the auto-import criteria, the lead/contact will still be auto imported—but up to 3 hours after it was updated.
Real-Time Auto Import using Legacy Workflow Rules (For Existing Leads/Contacts)
In order to use Real-Time Auto Import for existing leads or contacts, you'd need to have a very similar Workflow Rule to the one above trigger based off of a field update in SFDC. The workflow rule triggers Groove to run an import in all auto-import enabled flows. It is critical to ensure that the contact/lead records are present in the reports/saved searches powering these imports. In order to set up the workflow rule, follow the directions below.
-
-
In Salesforce click Setup > Workflow & Approval > Workflow Rules
-
Click into the Workflow Rule called 'Notify Groove on Contact Created (Managed)'
-
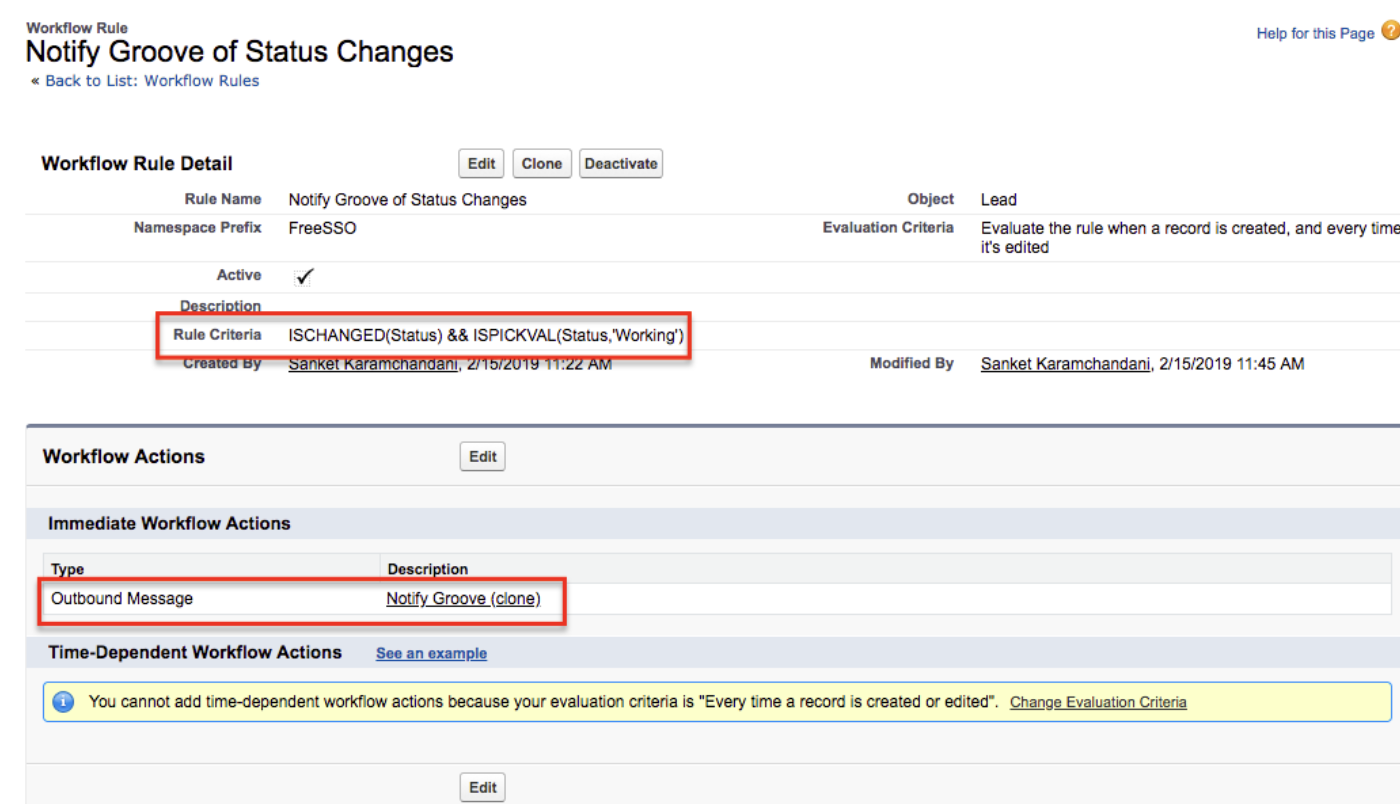
Click on the Workflow Action 'Notify Groove (Managed)'

5. Clone the Workflow Action, and name it 'Notify Groove (clone)'; ensure that the 'User to send as' field is set to a real SFDC user on your team. We'll need this cloned Workflow Action a bit later in the process.
6. Go back to All Workflow Rules, and create a new one (for the Contact object and/or the Lead object).
-
Evaluation Criteria: Evaluate the rule when a record is created, and every time it's edited.
-
Rule Criteria: When the formula evaluates to true. The example below will make the Workflow Rule trigger when a Lead Status is changed to 'Working'; you can set the Rule Criteria to fire based off of a different field that your team finds more relevant.
-
Immediate Workflow Actions: Add in the cloned Workflow Action from step 5.
7. Activate the Workflow Rule