Groove Call Settings
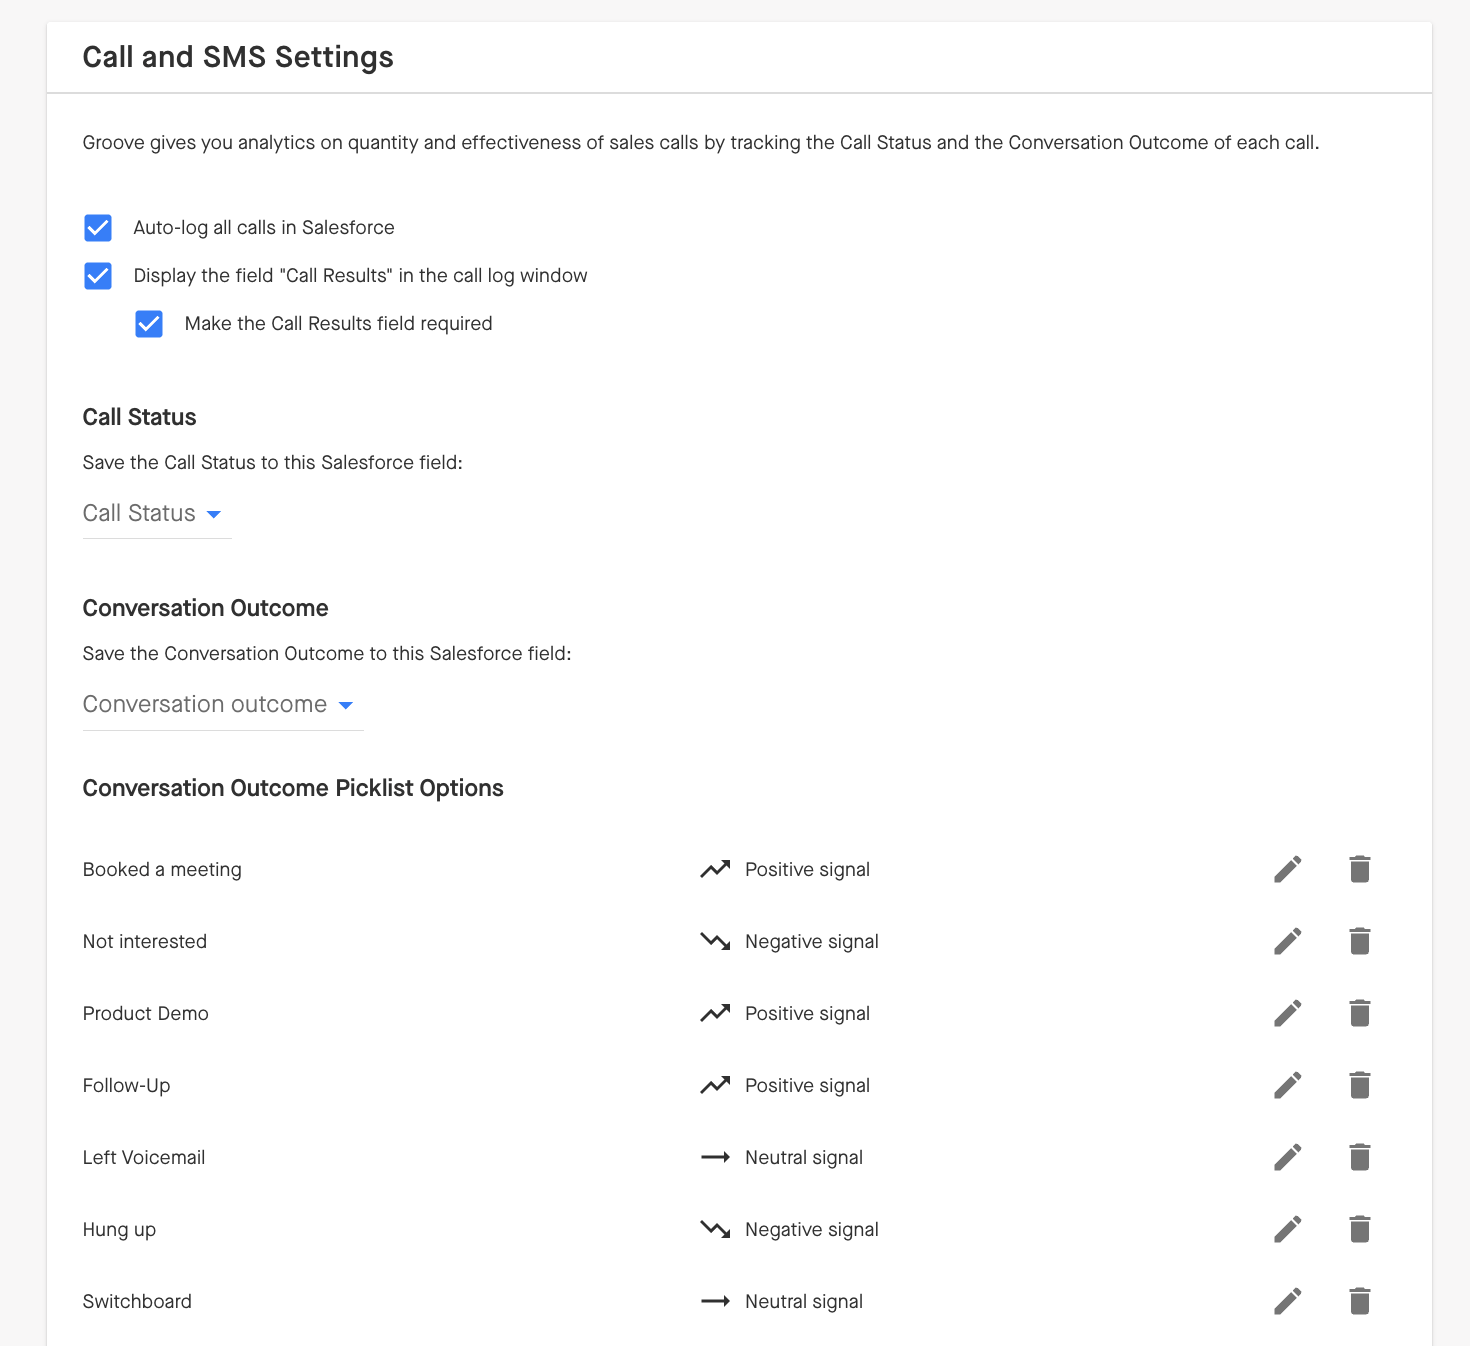
Clari Groove Admin can modify their organization's call settings and choose which Salesforce fields Call Status and Conversation Outcome save to.
Call Settings Getting Started
-
Auto-log all calls in Salesforce: Groove will automatically log all calls made through Dialer to Salesforce, and relate them to the correct lead, or contact/opportunity pair. This includes both inbound and outbound calls. The user does not need to explicitly click log, but can include their own notes in order to update the logged call. This ensures data accuracy for all calls going through Dialer.
-
Display the field "Call Results" in the call log window: We recommend keeping this enabled. This will make sure that the Call Results dropdown shows up for your users so they can properly log calls, their statuses, and notes
-
Make the Call results field required: This makes it required for your team to properly fill out a call log, and note the result of the call.
Customizing Call Statuses and Outcomes: How Calls Log to Salesforce
When your team is logging calls to Salesforce (with or without Groove's Dialer), the results of these calls get mapped back to Salesforce. You can configure where these call results will be found in Salesforce using the Call Settings section in Manage My Org.
Option 1 (Default): Use the native 'Call Result' field in SFDC
By default, Groove logs 'Call Result' to the native 'Call Result' (Field name: CallDisposition) field in SFDC. If you'd like your calls to log to Call Result, there is no additional action that needs to be taken to set this up.
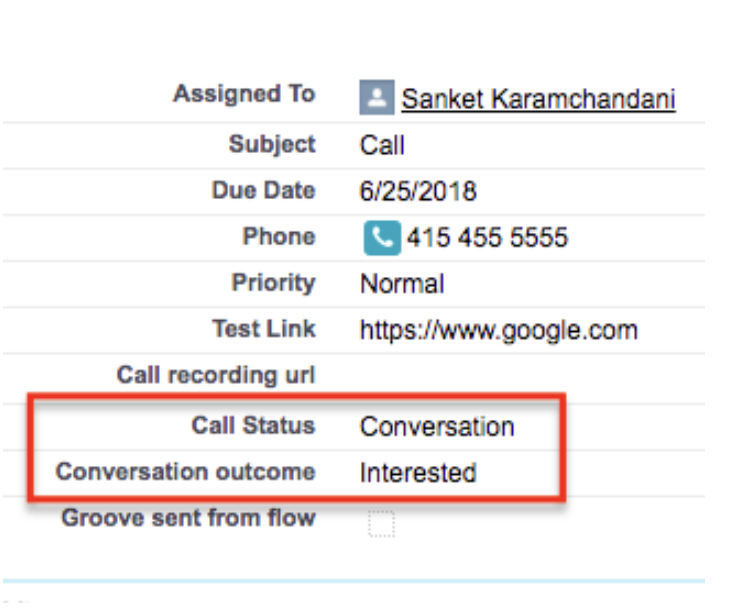
The Call Status (Conversation vs. No Conversation) as well as the Conversation Outcome get paired together in one field, Call Result. In this case, the Call Status is 'Conversation' and the Conversation Outcome is 'Call in 3 months' but the Conversation Outcome is the value that will be displayed in Salesforce.
Option 2: Map to Activity custom fields
You can also have the Call Status and Conversation Outcome mapped back to separate fields in Salesforce so that you can more easily run reports on calls that resulted in a conversation versus those that did not.
In order to set this up, you will need to do the following:
-
In Salesforce, navigate to Setup > Customize > Activity Custom Fields
-
Create 2 picklist Activity Custom Fields. Clari Groove recommends naming them "Call Status" and "Conversation Outcome"
-
Make sure "Restrict picklist to the values defined in the value set" is unchecked
-
Click here and press the RETURN or ENTER key to refresh your SFDC data if you just created these fields
-
-
Make sure 'Display the field "Call Results" in the call log window' is checked (see below)
-
Choose the fields you just created in Salesforce for Call Status and Conversation Outcome (see below)

Now when your team logs calls, the Call Status and Conversation Outcome will map back to these created fields:

When you've mapped Call Status and Conversation Outcome to two separate fields:
- Calls logged with a value from the "Conversation" section of the Conversation Outcome picklist will have "Conversation" in the field mapped to Call Status and the specific conversation-outcome picklist value in the field mapped to Conversation Outcome.
- Calls logged with a value from the "No Conversation" section of the Conversation Outcome picklist will have the specific no-conversation-outcome picklist value in the field mapped to Call Status and nothing in the field mapped to Conversation Outcome.
Note: Because Groove will always write the specific conversation outcome picklist value to the Salesforce standard "Call Result" field (API Name: CallDisposition), we do not recommend mapping Call Status to the Salesforce "Call Result" field if you're mapping Call Status and Conversation Outcome to two separate fields.
Adding Custom Conversation Outcome Picklist Values
Groove Admin can add to the Conversation Outcome fields that are shown while logging a call from Manage My Org. These values will be added to the "Conversation" section of the Conversation Outcome picklist in the Action Compose window and OmniDialer.
- Go to Manage My Org > Call and SMS Settings
- Scroll to the Conversation Outcome section and click "Add New Outcome" at the bottom
- You can also use the Pencil or the Trash-can icon next to the existing outcomes to edit or delete them
Please contact the Clari Groove support team here to add custom values to the "No Conversation" section of the Conversation Outcome picklist.
Add Additional Call Logging Fields
With this feature, Admin can make sure their reps are logging all the important Salesforce fields you want them to fill out after every call.
For example, you can add a "Current Solutions" field so that you can create a report on contacts that are mentioning they have another solution on your rep's calls.
To do this:
- Go to Manage My Org > Call and SMS Settings
- Scroll to the Additional Call Log Fields section
- Check "Make additional fields required" to ensure these fields are required for reps to fill out
- Search and check the fields to include in OmniDialer (see below)
-
You can select up to 3 additional fields to be added to Omnidialer
-
These fields will be pulled from whatever is available on the Call task
-
This feature supports only picklist fields, dependent picklists and multi-select fields from Salesforce
Custom Salesforce Opt Out Fields
Groove helps ensure your organization is compliant, especially when your team is making hundreds of calls and text messages a day using Dialer.
You can configure Custom Opt Out fields in Salesforce for both Calls and SMS. If these fields are checked, Groove will make it easier for your team by blocking them from contacting the opted out contacts or leads from Salesforce via the Dialer.
Setting Up a Custom Call Opt Out Field
Set up a custom call opt out field in order to ensure that your team cannot call a contact or a lead who has opted out of communication. If a contact or lead tells verbally tells a rep that they would like to stop receiving calls from your organization, your rep can check the Call Opt Out field box on the contact or lead's page.
You'll need a Salesforce opt out field. To set that up:
3. If you want reps to have the option to check this field within the Dialer anytime they log a call, Groove recommends creating a custom value in the conversation outcome as shown in the above section of this article — and calling it something like "Opted Out."
Then, you must set up a Salesforce Flow that will check your Call Opt Out field to true when your rep selects the "Opted Out" conversation outcome while logging calls via Dialer.
Setting Up a Custom SMS Opt Out Field
Set up a custom SMS opt out field in order to ensure that your team cannot text a contact or a lead who has opted out of communication. Anytime a rep texts a person from the Dialer, they receive a message letting them know they can unsubscribe to messages from your org by texting "STOP". If a contact or lead texts back the message "STOP", this feature Dialer will automatically check the SMS Opt Out field box on the contact or lead's page and your reps will no longer be able to text them via the Dialer.
SMS Opt-in Mechanisms
"Because the goal of a compliant campaign is to only send communications that consumers or constituents want to receive, handling opt-ins and opt-outs properly is fundamental. Under the new CTIA guidelines, sending messages requires written consent to specifically receive promotional messages. However, whether or not your messages are promotional, we recommend that all opt-ins be documented in some way so that you can demonstrate how and when you received the consumer’s consent to send him or her messages." - Twilio
An opt-in is the consumer’s consent to receive messages. It’s important that opt-ins are contextual and timely. The goal is to ensure that you and the consumer are both clear about whether that consumer wants to receive the particular messages you intend to send.
Here are a few recommendations on how to receive timely documentation and proof of SMS opt-in from your clients and prospects:
You should always tell consumers exactly what they are signing up to receive. For example - your first message should have opt-in language:
“Hi, this is {!firstname} from {!companyName}. If you would like to continue to receive messages from me, please reply with ‘yes’.”
We recommend setting up a Groove Flow with an SMS template that has this type of opt-in language, to ensure all your clients are opting in this way before you reach out to them.
Prior to sending the first message, gather your client's opt-in consent via your company website. You can set up a "Contact Us" form on your website that allows the client or prospect to consent to receiving messages via the form. This opt-in info should also be tracked in Salesforce as a common best practice.
Ensure Call Opt Out and SMS Opt Out fields are Mutually Exclusive
In some instances you will want to make sure that if a contact or lead has opted out of one form of communication you will want to make sure there are no other forms of communication that your reps can contact them in with Groove. For example, if the person does not want to receive calls from your org any longer, you will want to make sure your reps cannot text them either. Or in some cases not even allow them to email the person as well! This can be resolved by setting up a Salesforce Flow.
Opt Out Settings User Experience
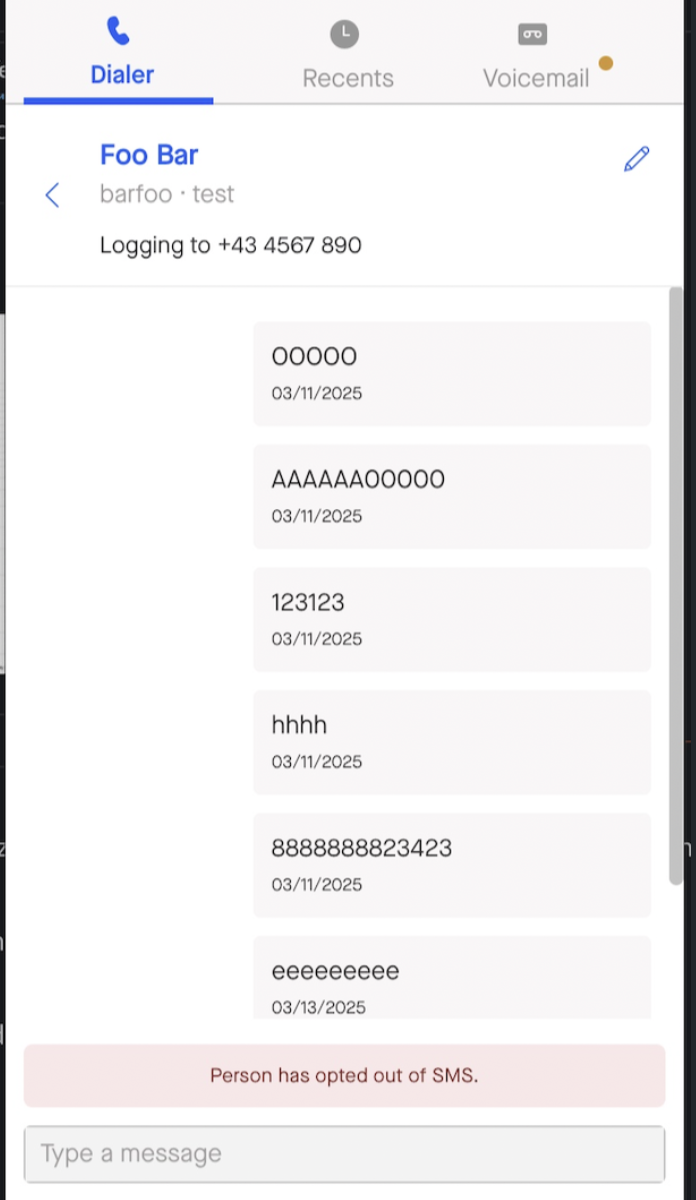
Here's what it looks like for reps when you use the Opt Out setting:
When User tries to send a message to the Person who opted out, they'll see errors in the SMS conversations:

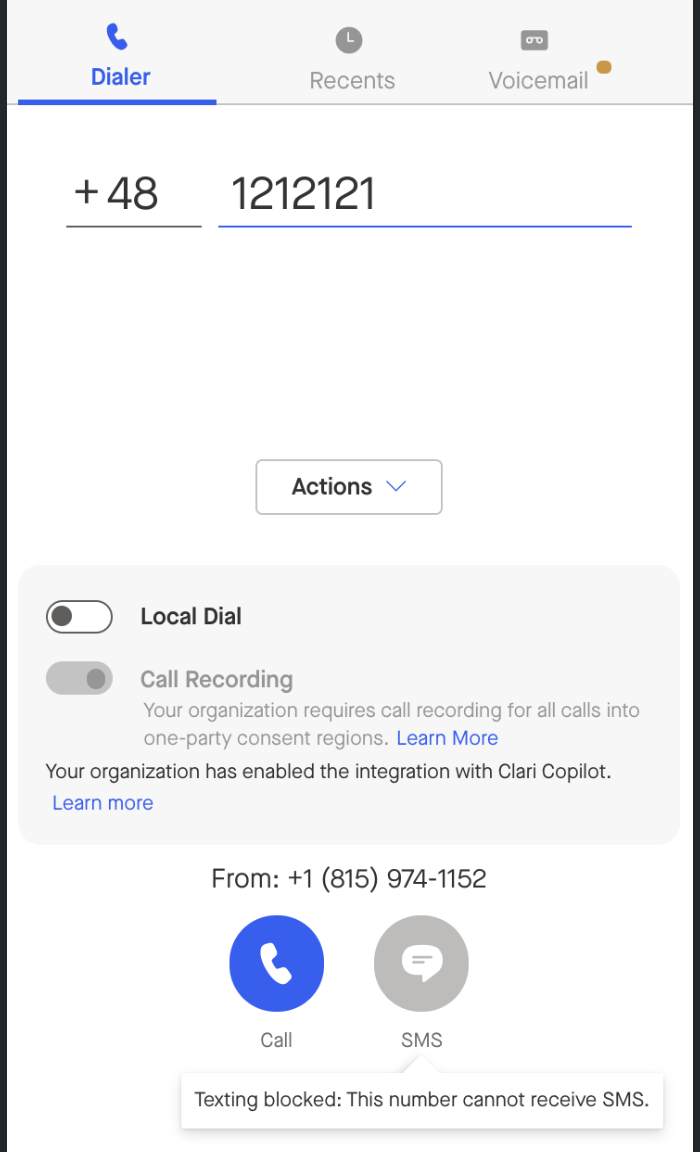
When user types invalid number or the one that cannot receive text message, the SMS Icon is greyed out and there’s tooltip informing about the reason:


