Groove Flow Import Rules: Activation and Block
Flow Block Import Rules allows you to create rules that determine which records can't be imported into a Flow. These parameters can be set at the Flow or Global levels using Salesforce Fields.
Flow Level Block Import Rules
Import Activation Rules
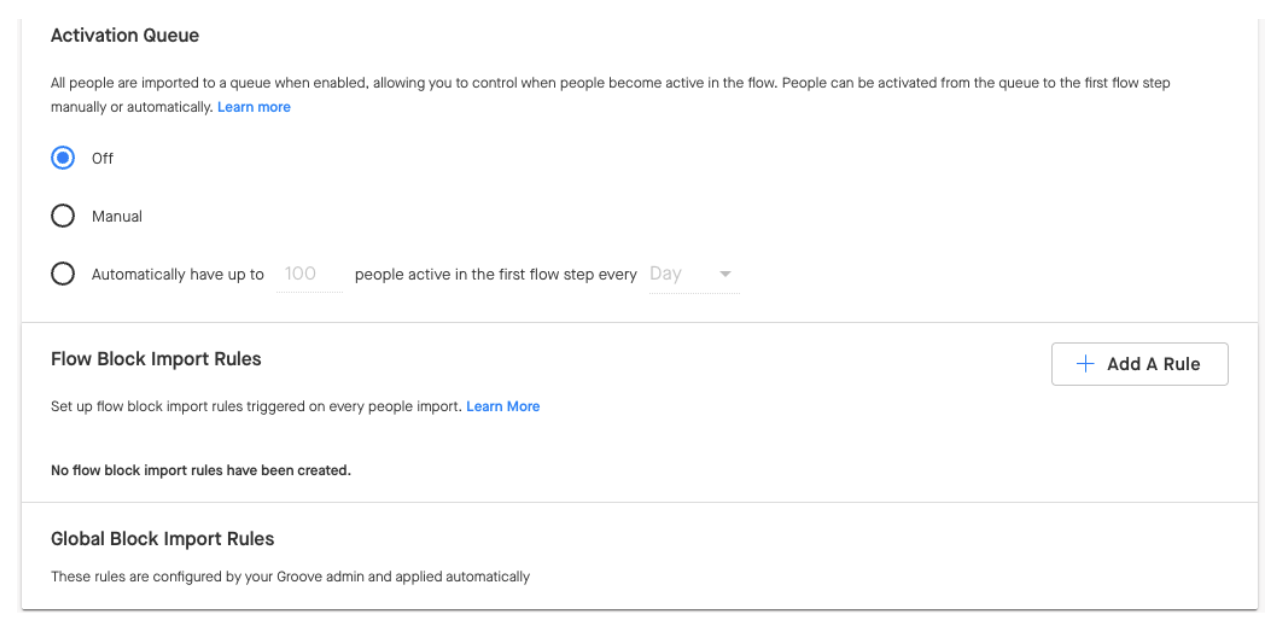
Enabling the activation queue on a Flow can help manage the amount of work that becomes active in a Flow in a given time period. This can either be set up to automatically activate on a specific time cadence, or you can have the user activate specific records manually.
To enable Activation Queue:
1. Go to Flows and open the Flow you want to enable activation for
2. Go to the Settings Tab at the top of the FlowIn the left nav, go to Activation Queue
3. Set your Activation settings. The queue will be off by default on any existing or new flows created but can be turned on as needed.

If you select Manual Activation
The people added to a Flow will always go to the Queue section (see below) when added. To activate a Flow for a given user, you must manually move them to step one.

If you select Automatic Activation
People automatically move to the first step of a Flow. Users won't be able to decide which records get moved from the Queue into the first step of a Flow. This will be determined on a first-in, first-out basis. When Automatic activation is set, the Flow owner can choose whether or not to limit the number of records on an account or domain basis:
Account Basis: Use the account ID from Salesforce to determine the uniqueness.
Domain Basis: Uses the domain from the contact/lead records from salesforce to determine uniqueness. This means that someone could be a part of different accounts (parent/child) but have the same domain, and be limited by this rule.
Activation Queue Best Practices
The Activation Queue in Groove allows you to control how many new contacts enter your Flows each day, making engagement more manageable. This guide clarifies common misunderstandings and best practices.
1. What is the Activation Queue? (and What It's NOT)
The Activation Queue is like a holding area for your contacts. When you import a large list, instead of all of them entering your Flow at once, they wait in this queue. You can then set a daily limit for how many contacts move from the queue into the first step of your Flow.
Common Misunderstanding: It's common to think that the "automatically activate up to “N” number people every day" setting is a strict daily limit. And that no matter what, only that exact number of contacts will ever enter their Flow in a single day.
The Reality: Imagine your Flow's first step is a bucket, and the Activation Queue is a tap filling it. You set a limit for how much water (contacts) you want in the bucket each day.
-
If your bucket has a hole in the bottom (an "auto-send" first step), water is constantly leaking out.
-
The tap (Activation Queue) keeps checking the bucket, sees it's not full, and keeps pouring more water in.
-
Result: Your bucket keeps emptying and being refilled, and you end up with more contacts than you intended in your flow, even if you set a daily limit!
This means the "limit" isn't a hard limit if the Flow's first step is constantly emptying.
2. The "Auto-Send" Trap: Why Your First Step Matters
The biggest reason the Activation Queue might not behave as expected is often tied to the very first step of your Flow.
-
The Problem: If your Flow's first step is set to "auto-send" (for example, an email that goes out automatically without any manual action from you), it creates that "leaky bucket" scenario.
-
Why it Happens: The Activation Queue is triggered to look at the first step of your Flow and count how many contacts are currently there. If it's an auto-send step, contacts move out of it in a pre-determined send cadence, and the first step always has a void that needs to be filled. The activation queue sees this "empty" space and thinks, "Great! I can send more contacts!" It then continuously pushes more contacts through, regardless of your intended daily limit.
-
Impact: Many more contacts activate than you planned, making the Activation Queue seem ineffective.
3. The "Constant Interaction" Pitfall
The Activation Queue works best when you set it up and then let it do its job. Frequent interaction can also cause unexpected activations.
-
The Issue: Every time you add new contacts to a Flow that has an active Activation Queue: whether you manually import them or they come in automatically from a report that's constantly refreshing, the queue immediately re-evaluates the first step.
-
Consequence: If the first step of your Flow has space (meaning it's below its daily limit or is an auto-send step that's constantly emptying), the queue will activate more people right away. This can happen even if the main daily activation job hasn't run yet, or if you've already processed your "daily" batch.
-
The "Sit It and Forget It" Principle: For the Activation Queue to work as intended, it's best to:
-
Import your large list of contacts into the queue all at once.
-
Then, let the queue manage the daily activations on its own. Constantly adding new contacts or having an auto-import report continuously feeding the queue will lead to continuous activation, overriding your daily limits.
4. Best Practices for Activation Queue
To ensure your Activation Queue works exactly as you expect and helps you manage your contacts effectively, follow these key best practices:
-
Rule #1: Manual First Steps are Key!
-
Why: This is the most crucial step! When your Flow's first step requires a manual action (like you manually sending an email), contacts will "wait" in that step until you act. This allows the Activation Queue to get an accurate count of how many contacts are truly "active" and respects your daily limit.
-
Examples of Manual First Steps: A manual email step, a task assignment step, or any step that requires you to click "complete" or "send."
-
Rule #2: Import Once, Then Let It Flow.
-
Advise: When starting a Flow with an Activation Queue, import your initial large list of contacts in one go.
-
Avoid: Do not continuously remove contacts from step 1 of the Flow (either manually or via auto sends) if you want the daily activation limit to be strictly followed.
-
Rule #3: Understand the Daily Cadence.
-
How it Works: The primary activation from the queue happens once a day (typically around 5 AM PST).
-
Your Action: Process the contacts that were activated for that day, and then wait for the next day's automatic activation. Avoid manually triggering additional activations.
-
Rule #4: Activation Queue is NOT Email Throttling.
-
Email Throttling: This is a separate safety feature that slows down email sending to prevent you from hitting limits set by email providers (like Microsoft or Google). It makes your sending look more "human."
-
Clarification: Email throttling is not designed to be the primary way you limit contacts entering your Flow. Relying on it to control Flow entry when your Activation Queue isn't set up correctly will likely lead to more emails being sent than you intended.
Block Import of Records into Flows
Applying Flow Block Import Rules at the flow level can help you be more specific and granular in how you block contacts from entering a flow. For example, if you have a flow that is only for unworked leads, you can set a rule at the flow level to block any leads where the Lead > Status = Working.
To apply Flow Level Flow Block Import rules
-
Go to Flows and open the Flow you want to apply Flow Block Import rules to.
-
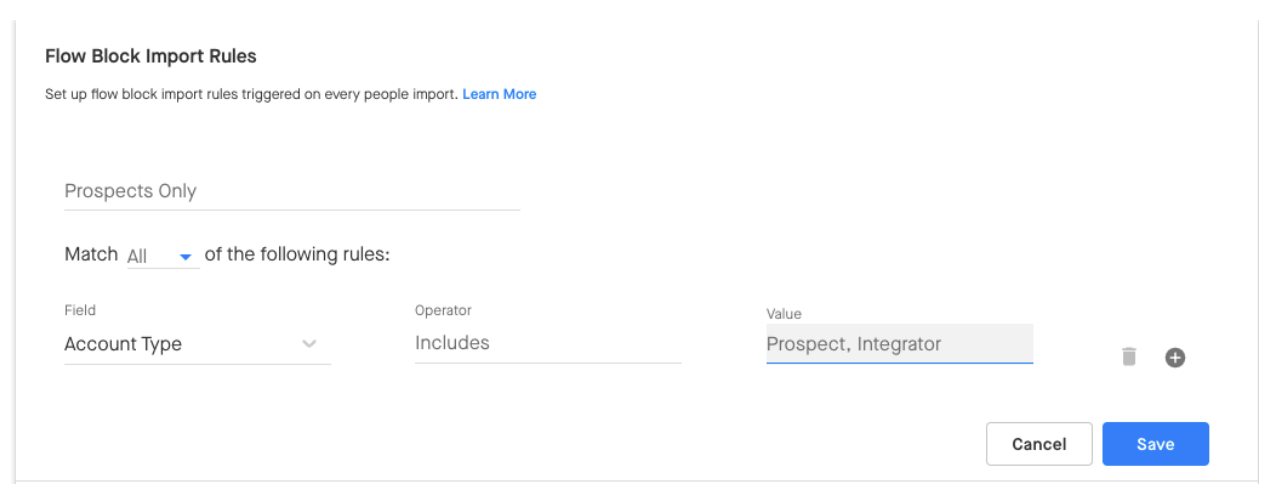
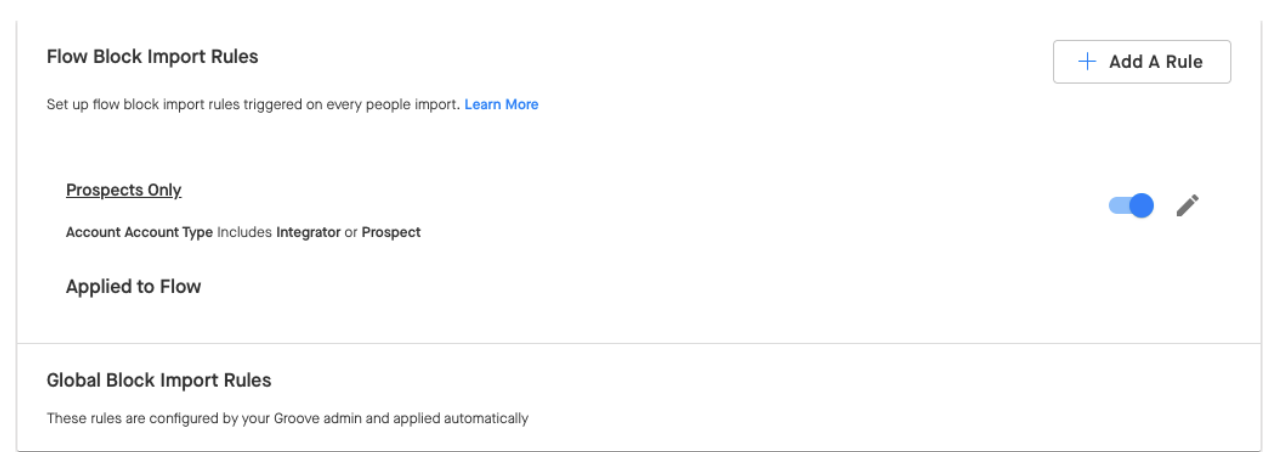
Go to Flow Settings tab at the top, then click Add A Rule (see screenshot above).
-
Set up your rule, and click Save.

Here's what each setting means:
Name: This name will be used to display to users why a particular lead or contact cannot be added to a flow. Please use a name that is descriptive, but concise.
Match Criteria: Please choose whether or not the rule should match all of the criteria or any of the criteria.
All: Every criterion needs to be met in order to block a record from being imported
Any: Only one of the criteria needs to be met in order to block a record from being
Select Criteria: All criteria are set using fields on Standard Objects in Salesforce.
After you save your rule, you must enable it to make it active:

Note: The result of every rule will be to block import into the Flow.
Global Block Import Rules
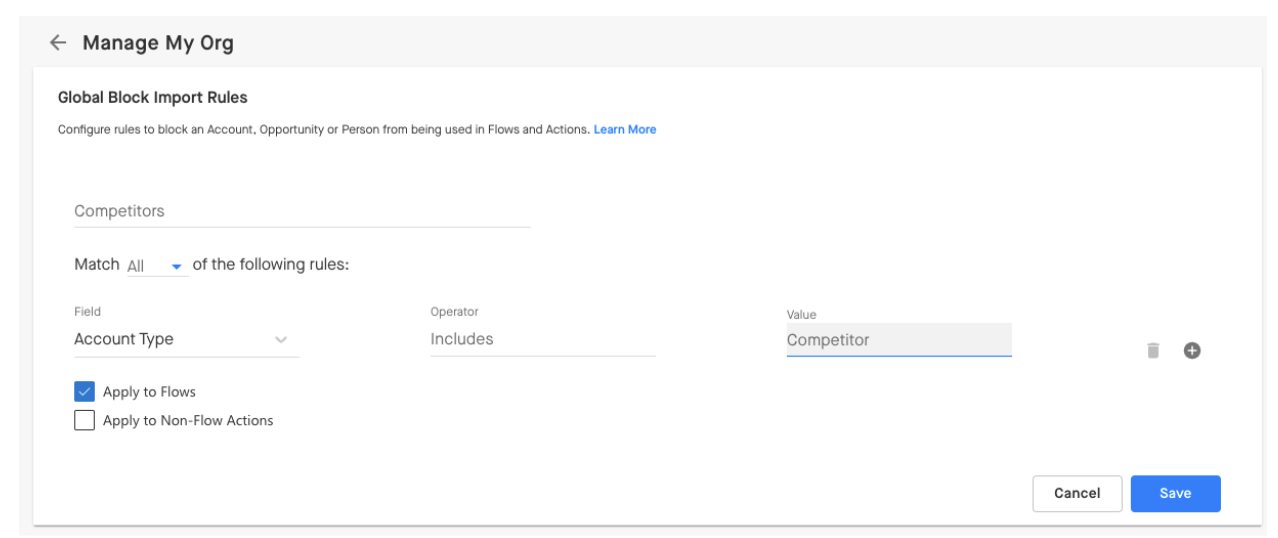
Note: Only admin can create Global Block Import Rules. Only block rules are available globally. You will not find Activation settings available in Manage My Org.
Global rules will apply to every flow created in your organization. To apply rules more granularly please see how to set Flow Block Import Rules at the flow level.
To set Global Block Import Rules:
- Go to Manage My Org > Flow Settings
- Click the ">" next to "global block import rules enabled/disabled"
3. Click "Add A Rule"
Note: If this button doesn't allow you to click, refresh your page and try again!

4. Then complete the required information to create a rule:
Note: The result of every rule will be to block import into the Flow.
Name: This name will be used to display to users why a particular lead or contact cannot be added to a flow. Please use a Name that is descriptive, but concise.
Match Criteria: Choose whether or not the rule should match all of the criteria set or any.
All: Every criterion needs to be met in order to block a record from being imported
Any: Only one of the criteria needs to be met in order to block a record from being imported.
Select Criteria: All criteria are set using fields on Standard Objects in Salesforce.
-
First Select the field that you want to use
-
Then select the operator
-
Finally set the value of that field.
5. Click Save.
6. The Rule is not active until it is enabled

What happens when users try to import something that's been blocked?
When users break an import rule, they won't be able to import into the Flow and they'll see a message like this:
Import Blocked - This person cannot be added due to the following rule: Exclude Contacted Leads


