Install and Set Up Groove for G-Suite
Groove’s integration with G-Suite enables you to track when your prospects open your emails, log your email and calendar activity to Salesforce both manually and automatically, view and edit Salesforce records directly from your inbox and calendar, and more.
Note: If your team is transitioning from using Microsoft to using G-Suite, please reach out to your CSM before setting up Groove in G-Suite so that our team can help with migrating your accounts.
Install the Groove Chrome Extension
The Groove Chrome extension is the piece of Groove functionality that allows you to access Groove’s tools into your Gmail, Google Calendar, and Salesforce environments. The Groove Chrome extension can be installed in Google Chrome or in Microsoft Edge through the following steps:
-
Install the Groove Chrome extension here.
-
Once added, you’ll be redirected to a page to connect your Groove account to G-Suite. Sign in with your G-Suite credentials or, if your team uses an SSO solution, your SSO credentials.
-
You’ll then be redirected to a page to connect your Groove account to Salesforce. If you have Salesforce open in the same browser and in a different tab, you'll see a window pop up where you can accept Salesforce permissions. If you aren't logged into Salesforce in a different tab, you'll be prompted to log in with your Salesforce credentials or, if your team uses an SSO solution, your SSO credentials.
-
Complete the setup flow to configure your Groove account settings.
Groove Extension Set Up Flow
Once you’ve signed connected your Groove Chrome extension to your G-Suite and Salesforce accounts, you’ll be prompted to configure some basic settings for your Groove account. You can always update these settings later by navigating to your Groove Extension settings page, as described here.
Select Your Role
Choose the role that best describes your current job function. This information will be used to optimize your Groove experience down the line.
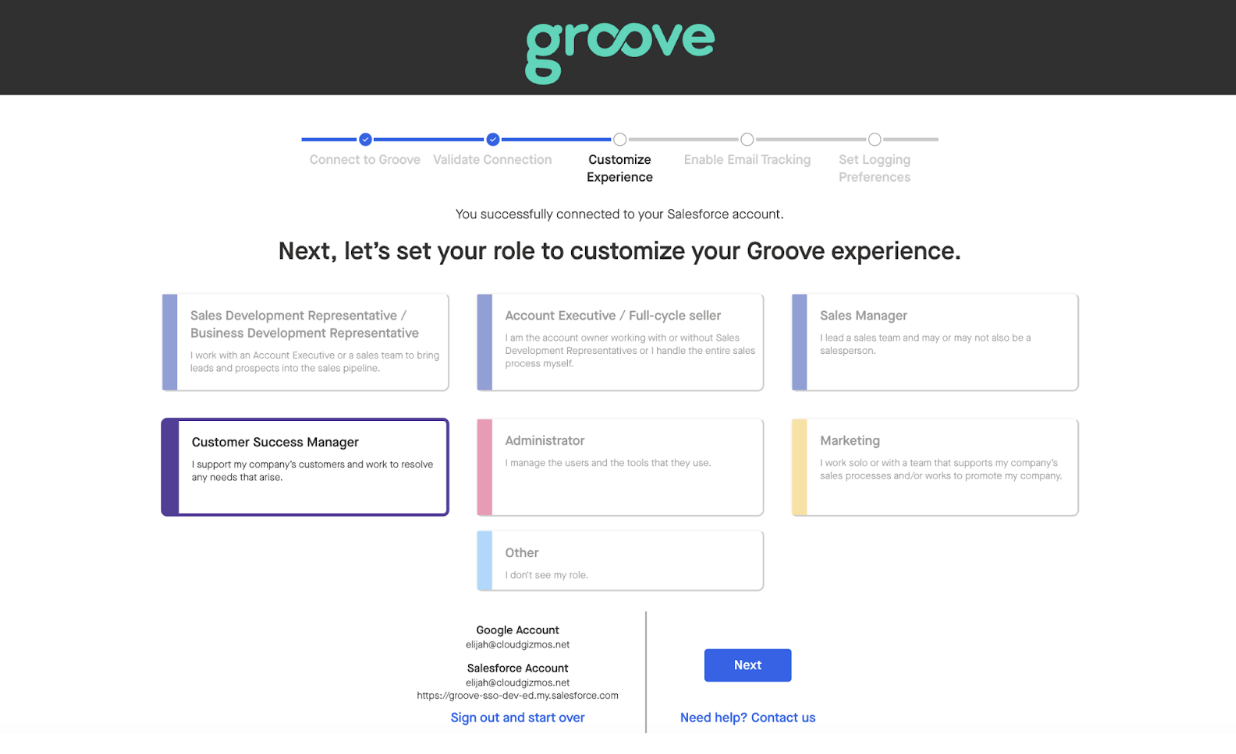
Choose Your Email Tracking Settings
Next, select your preferences for your Email Tracking. When you compose a new email in Gmail, these settings will determine whether your email is set to track for email opens and link clicks automatically or not. Regardless of your Email Tracking defaults, you can still choose to track or not track an email.

-
Track when someone opens my email: This setting makes it such that all emails you compose from Gmail will default to tracking for email opens. You can still choose not to track a given email by deselecting the Groove email-open-tracking box in your Gmail compose window before sending an email.
-
Track when someone clicks a link: This setting makes it such that all emails you send from Gmail will default to tracking for link clicks. Any emails that have a hyperlink in them are able to be tracked for link clicks. You can still choose not to track a given email by deselecting the Groove link-tracking option in your Gmail compose window before sending an email.
If you choose to enable the email tracking settings, you will be prompted with a pop-up to allow additional permissions. Please select “Allow” as these permissions are what will enable Groove to insert an invisible tracking pixel into your emails.
Note: If either of these options are grayed out for you, that indicates that your internal Groove admin team has disabled email tracking for your account.
Learn more about tracking the emails you send from Gmail here!
Configure Your Logging Preferences
Lastly, select your email and calendar logging preferences. These settings will determine how your email and calendar activity is logged to Salesforce.

-
Auto-log all emails: If you select this setting, then all emails you send to or receive from a Salesforce Contact or Lead will be logged to Salesforce automatically. Emails you send will log to Salesforce immediately while emails you receive will sync to Salesforce within 15 minutes of them being received. With this setting, you will not be able to choose not to log an email to Salesforce.
-
Auto-log only outbound emails: If you select this setting, all outbound emails you write to a Salesforce Contact or Lead will default to being logged to Salesforce. The “Log” checkbox in the Groove toolbar in your Gmail compose window will be checked by default; however, you can choose not to log an email by deselecting the “Log” checkbox. All inbound emails will need to be logged manually.
-
Manually log emails: If you select this setting, all emails you write to and receive from a Salesforce Contact or Lead will not be logged by default. You can still log outbound emails by checking the “Log” box in the Groove toolbar in your Gmail compose window before sending or by logging the email after its been sent. All inbound emails will need to be logged manually.
-
Auto-log all calendar events: If you select this setting, then all calendar events you create with a Salesforce Contact or Lead will be logged to Salesforce automatically. Events you create will log to Salesforce immediately while events you are invited to will sync to Salesforce within 15 minutes of them being created. With this setting, you will not be able to choose not to log an event to Salesforce.
-
Auto-log only outbound events: If you select this setting, all outbound events you create with a Salesforce Contact or Lead will default to being logged to Salesforce. The “Log” checkbox in the Groove toolbar at the top of your GCal event creation page will be checked by default; however, you can choose not to log an event by deselecting the “Log” checkbox. All inbound events will need to be logged manually.
-
Manually log events: If you select this setting, all events you create with or are invited to by a Salesforce Contact or Lead will not be logged by default. You can still log outbound events by checking the “Log” box in the Groove toolbar at the top of your GCal event creation page before saving the event, or by manually logging the event after it’s been created. All inbound events will need to be logged manually.
Note: If any of these settings are grayed out or preselected for you, that indicates that your internal Groove admin team has either disabled some of these settings or has forced them for your account.
Access Your Groove Extension Settings
With the Groove Chrome extension, you can always access and reconfigure your Groove Chrome extension settings from wherever you are. In places where you have access to the Groove Omnibar (such as Gmail, Google Calendar, Salesforce, and the Groove web app), you can navigate to settings by:
-
Opening the Groove Omnibar (the blue infinite logo, to the right!)
-
Clicking the ellipses in the upper-right corner
-
Selecting “Options” from the dropdown menu

You can also access your Groove Chrome extension settings from within the Groove Notification Hub, which enables you to reconfigure your settings no matter what page you’re on. You can access this page by:
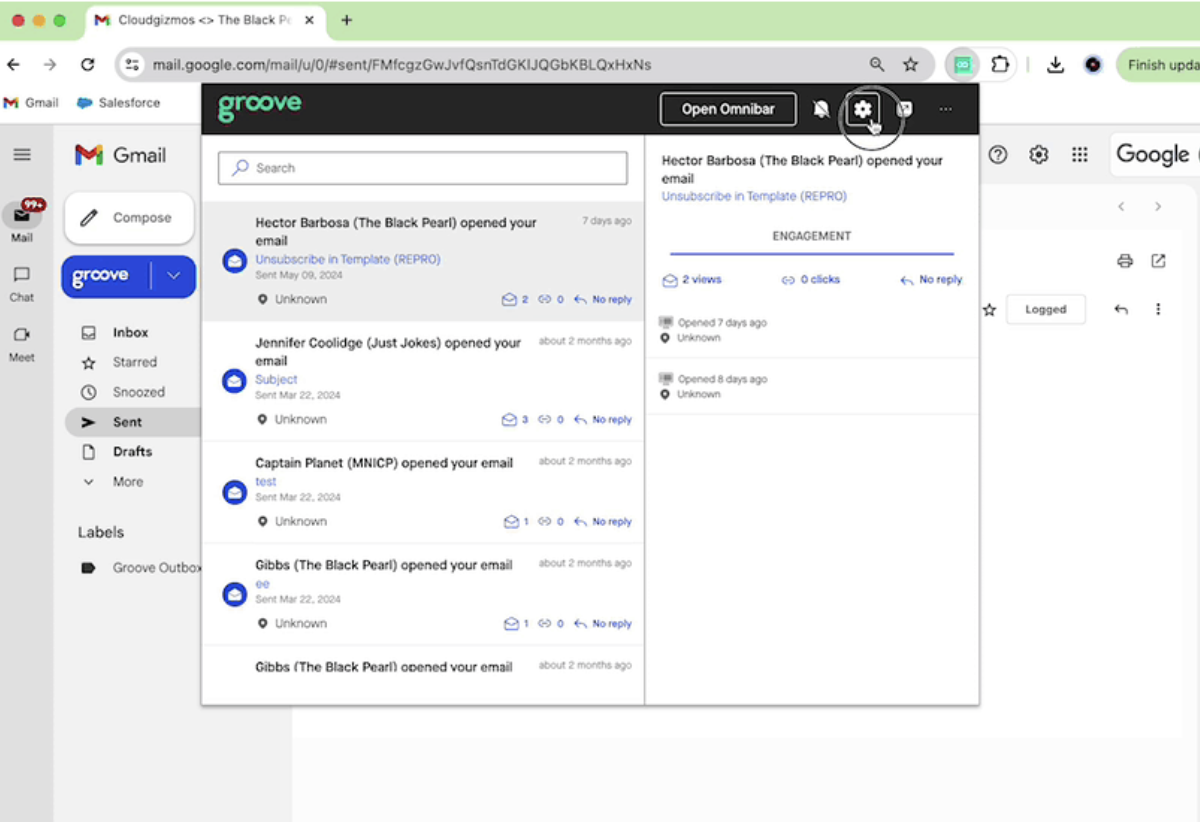
Any adjustments you make to your settings from either of these locations will save automatically.
You can also access a fuller list of settings for your Groove account from the Settings page of the Groove web app, found here.
Signatures in Groove
Groove will abide by your Gmail signature settings for any emails you send directly from Groove, from Groove Flows, or from Groove OmniActions. As long as your email signature has been created and saved in your Gmail settings through these steps, Groove will append it to any emails you send.
Read Next
G-Suite Users: Extension Upgrade Highlights
Groove Omnibar Overview
